

Propagation
First time propper? No problem!
If this is your first foray into propagating plants, then it's ideal to start with something like philodendron, epipremnum or monstera. These genus often have longer internodes, allowing more room for error with your first propagation project. If you wanted to take a 'top' cutting then you would cut at cut line 2, if you wanted to take a 'mid' or 'stem' cutting you would cut at lines 1 and 2.
A top cutting often maintains the size of the leaves (if given the right circumstances). A mid or stem cutting will have to create a new growth from the node, so the new growth will revert back to being smaller/juvenile.


Propagation with moss
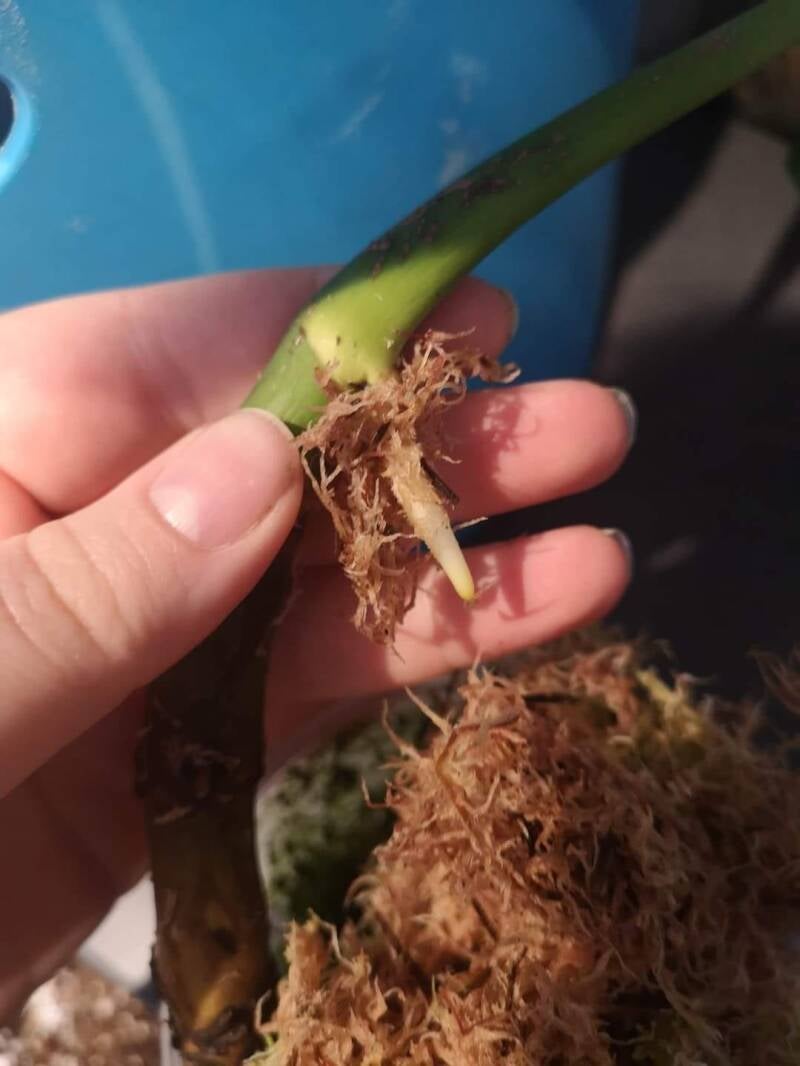
One of the most tried and tested ways of propagating is using sphagnum moss. Sphagnum moss is an amazing resource because it is a non-vascular plant which means that it grows completely without roots and absorbs the water and nutrients that it requires via it's surface of leaf-like scales. It is extremely important to source sphagnum moss from reputable companies who can guarantee that it has been harvested sustainably. Sphagnum covers the peatlands, which absorb an incredible amount of C02 from the atmosphere, this makes peatlands an essential resource in the fight against the climate emergency. As soon as peatland is damaged, or degraded (or harvested for Sphagnum) the stored carbon is released into the atmosphere as carbon dioxide. There are approximately 30 species of Sphagnum in the UK, and there are over 300 species known globally.
Propagating with responsibly sourced sphagnum
I was initially quite unsuccessful in my experiments with moss, losing many wet sticks, and chonks because of my lack of experience. I am going to talk you through what has worked, and not worked for me.
In my first attempts I was using a small amount of moss in a plastic Tupperware container, you can have a couple of holes poked in the lid or no holes depending on what works best for you. If you will not be making holes, bare in mind that you will need to open the box a couple of times a day for a good airflow exchange. I found using both methods I was still unsuccessful in getting any new growth, so I decided to try the technique that now works for me.
Container
I use a much larger container, a storage container works perfectly, I then make sure I have at least a couple of inches of moss. If you are using fresh moss you can pop this straight in, dehydrated moss will need soaking first, and then gently squeezing out so it is not sopping wet.
Heat
I find using a heat mat underneath really speeds up my root growth, or you can use excess heat from above a radiator, or popping the box on top of a chest freezer or similar.
Lighting
Then you'll need to consider your lighting options, I have a cheap Nicrew aquarium light above my box and it does the job just fine, alternatively you can look into more specialised lighting such as the T5 sunblasters, or Pianta v2 bulb if you have a lamp with a E27 fitting.
Ready to use
After you've completed the steps above you'll be ready to pop your props into the box, I sometimes pop cuttings straight into the moss that we added earlier, if it's something particularly precious, or something that I want to keep a closer eye on, I will use clear orchid pots or containers, fill with moss, pop the cutting in, and then pop these into the box. Then if I want to check on this propagation more regularly I can pick it up and take a look without disturbing any roots,
The next step is key... don't check on your propagations every 5 minutes! I know this step sounds simple, but every time you move the cutting/chonk to check on it you will disturb the root growth and slow down the process.
Propagation with Aeroponic/Hydroponic Set Ups
You may have seen various hydroponic/aeropnic propagators in your search to find the right technique. I occasionally use a couple of these myself. I have the X-Stream Aeroponic Propagator which is fantastic for a number of reasons.
- Easy to use
- Easy to set up
- You can check the roots at any time
My experience with this propagator has been pretty successful for most aroids. I'll talk you through setting up, and using one of these.
Setting up an aeroponic/hydroponic propagator
Firstly you'll need to find the prime position for your unit, bare in mind that once filled with water it's quite heavy and cumbersome, so try and find somewhere appropriate for it to live. The noise of the water can be slightly annoying, I used to have mine in my bedroom and I ended up turning it off each night to combat the noise. You may have purchased the option that comes with sunblasters, if you have it's going to be super bright.
Once you've found the perfect home for the unit, you can assemble the sprayer function, on the 12site model it's quite simple, and units with 2- sites upwards will come with a piece of H shaped plastic. Xstream have made a great video to show you the unit in full here
Once you're all set up, it really is as simple as popping your cuttings into the neoprene collars, and resting them in the fitted holes. Water will be sprayed at the roots, and in no time at all you will see root growth. You will also notice that because you're using water based propagation there will be high humidity which is fantastic for new growth and baby plants. In the winter you might find the temperature of the water is pretty cold, I combatted this by using a really simple aquarium heater in the water tank. I don't need to use the heater in the warmer months, but it does keep things ticking over in the colder months. You can also add a dollop of a rooting product into the water if you want to, but there really is no need.
One thing that drives me crazy is algae build-up around the edges and moving into the clear plastic. This is a user error issue, and keeping the upper area dry will combat this.


Create Your Own Website With Webador